Showing posts with label Wardrobe Refashion. Show all posts

Friday, September 19, 2008

Making the Best of It

The other day I mentioned that I had found a couple of small holes in my quilt after I repaired the edge. I sat down in the sunshine today with a couple of needles and a helpful book, and spent a half hour or so doing some fancy darning...my first try at this sort of work. Here's a pictorial record.


The Hole, roughly mended to keep the raw edges from unravelling during repair.


The Book. Full of useful knowledge and pretty ideas. I must keep an eye out for this one, for my own library.


The Patch. Stitched in DMC 223, 224 and 3347. Made up as I went along, trying to follow the instructions for "Spiderweb Stitch" and failing miserably, but still coming up with a pretty flower, so all's well that ends well.

And here's a progress shot of Charlotte's stocking.


Have a good weekend - I'm off to Fun Knits tomorrow with my knitting posse. We'll be stuffing ourselves with incredible food at the Lovin' Oven and spending the grocery money on laceweight. Fun!

Wednesday, September 10, 2008

Saving Nine

The year we got married, my mum and dad made us a quilt. Isn't that nice? They did one for each of us kids around the time we all got coupley: and the weddings went as follows.

Eldest - 1995
Youngest - 1996
Middle - 1997

So it was a hectic few years. My dad was off work due to an injury (broken neck, believe me or believe me not) during much of that time, and spent a lot of his recovery quilting. I love that.

Anyway, I am not one of those people who redecorates their house every year or two and has multiple sheet sets for each bed. I can't justify the money and the waste. But, I hadn't realised just how well-worn this quilt was until I was inspecting the fall linens in preparation for the cold weather, and saw the edge of it up close.


Ten meters of 5/8" double-fold bias tape, a little bit of pretty stitch work from the Pfaff:

and Presto! the quilt is ready for another ten years of duty.


When I was folding it up after rebinding it, I noticed two small holes in the patchwork top. I'll repair those and show them to you next week.

But in the meantime, I'd like to reflect on the concept of stewardship. I think it's one of those things that became unfashionable around the same time as marriage did - during the decades following the Second World War, when people were tired of making do and women were tired of staying home. I recall a magazine article I read in about 1982, entitled "Are You a Supermarket Miser?" It had a little quiz where you could find out if you were committing the sin of trying to save money.....sorry, I mean "pinch pennies". One of the questions was "Do you use plastic grocery bags for the trash instead of buying proper garbage bags?" The whole article was smugly tittering...you certainly got the impression that "Yes" was the wrong box to tick.

The article was written at a time when consumption was the height of fashion, when manufacturers were scrambling to make everything disposable. But you wouldn't have caught a pioneer family, or a Depression family, or a wartime family, throwing away a quilt that could be repaired for less than a half-hour's wage, or a towel that could be cut down into facecloths, or a facecloth that could be turned into a diaper, that could be turned into a rag.

I've been spending a lot of time thinking about this in the last while, especially since my bike was stolen and we realised we can't actually afford to replace it. Living on one income is difficult with gas at $1.34 a liter (and we're grateful it's that low), and flour costing me $15 per 10 kilo bag. As expensive as the essentials are, though, they're not what puts us into the overdraft.

Being part of a privileged class in a privileged nation brings with it a certain carelessness when it comes to small luxuries. I remarked to my sister the other day that it would be interesting to save all our receipts for a month, then go through and highlight everything we bought that was nonessential. Every bag of chips, every tall nonfat extra-hot latte, every video rental. I think it would be a little shocking to see the total.

I have a lot of skills. I can patch jeans. I can make bulletin boards, and clothes, and muffins. I can even darn socks, though whole-wheat breadmaking remains a challenge. I may not be making a wage, but I can at least avoid spending a wage we don't have.

As I spend year after year raising my children rather than editing government audit reports, living costs climb relentlessly. Like the Elliotts, we must retrench. Part of that is fixing my quilt, sure, and part of it is buying too-short thrift-store jeans and letting them down, but most of it is attitude. There's a......yes, I would say almost a shame that comes with being careful with money, even when it's by necessity rather than by choice. I had to search, there, for a phrase that wasn't demeaning: the first things that came to mind were "cheap", "skinflint", and "miserly". It's interesting: I'm obviously a product of my generation, latchkey kids raised by two working parents who bought cookies and threw away worn linens.

Is it okay now, at the beginning of a new, expensive century, to value skills like patching and darning? Can I be proud of myself for having saved that $90 for a new quilt?

I think so. I think the world might be ready for a person who spent five years in university, then four years wearing heels to a government office and getting $60 haircuts every six weeks, to stay at home every day educating the children and patching quilts. I might not be Rosie Riveter, but I'm still doing my bit for the war.

Friday, May 16, 2008

Reclamation is a beautiful thing.

I've been waiting to show you this FO for a while now, but the weather wasn't right for taking pictures, and I didn't have a photographer. This morning I decided, to heck with a photographer, I would ask my six-year-old daughter to take the photos.

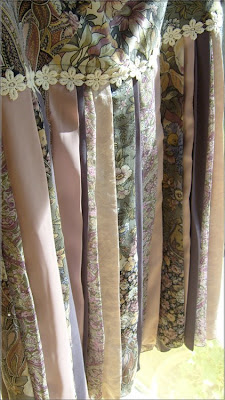
Salvage Skirt


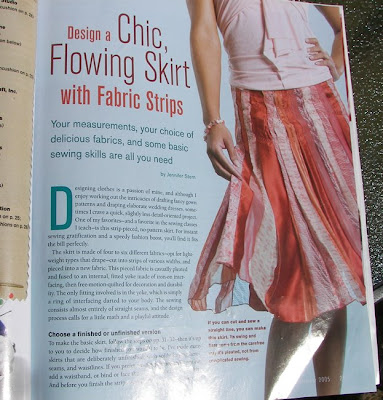
Pattern: None. Method suggested by Threads number 120, September 2005. Yoke adapted from Burda 8677.
Materials:
Invisible zipper
Cotton flower trim
Fabric strips:
-silk charmeuse
-Josef Otten cotton lawn
-silk satin
-polyester satin
-polyester double georgette
Yoke:
-Josef Otten cotton

I read this article when the magazine first came out. I liked the idea and started planning the skirt right away. Instead of buying meters of new fabric for it, I decided to cut up some finished garments that didn't fit or didn't look as nice as I thought they would.

Reclaiming fabric is a nice idea, but it can be time consuming, depending on the garment you're recycling. If the piece has a lot of seams, you might have trouble finding a long enough portion to make a workable strip.


This, like most other sewing, is a slightly space-intensive undertaking. All together, when I had all the strips cut, laid out, and sewn together along their long edges, the total length was 167". All that length had to be pressed, serged, pressed again, hemmed, pleated, and sewn to the yoke.


The magazine does not call for a separate, fabric yoke. According to the directions, you make a yoke, shaped to your waist-to-hip, out of fusible interfacing. You then pleat the skirt directly onto that - using the iron to press the pleats in place as you fuse them to the skirt. Then you free-form quilt all along the interfaced yoke to secure the free edges of the pleats. Insert a zipper, and you're done.


I didn't like the finished look of the piece as given. The pleats look a little random and messy to me - and I thought it would likely be unflattering to have them extend right up to the waist. I have no hips to speak of as it is, and the vertical lines would have eliminated what shape I have.


In order to create the illusion of a difference between my waist and my hip, I made a standard, shaped yoke out of a fabric that matched part of the skirt. For this I used my favourite yoke - from Burda 8677. I adjusted the length so that the seamline between the yoke and the fall would be exactly on the fullest part of my hip. I also fitted the seamline so that it would be quite a bit bigger than my actual hip, counting on the fullness of the pleated strips to hold it away from my body. To emphasise the seamline and broaden the hip a bit more, I added the flower trim.


I like how this turned out. Those 167 inches of skirt, when pleated in, really add a lot of swing. The fabrics are all light and flowy, as well, which captures motion beautifully. I don't know if you can tell from the pictures, but this skirt is full of light and drape.


The fabrics have various degrees of opacity, with some of them being very sheer indeed - this allows for an interesting play of light and shadow in the finished piece, while the pleats at the top take away any revealing glimpses that might otherwise result.


I think my favourite part of this skirt is the fact that it's recycled. I reclaimed fabric from a long, waistless sundress I hardly ever wore, a silk slip I made before I was married, two skirts that no longer fit me, and the lining from a skirt whose outside was so full of pulls as to be unwearable. The rest of the necessary strips I made from stash fabric that no longer appealed to me as they once had.


I would make this again. Happily, having worked through the method once, it'll be a lot simpler next time. But for now I'm out of garments to cut up, so I'd have to buy fabric for the next one. You could really go as expensive or as cheap as you wanted - or a mixture of the two. You could use silks, if you like, or you could use poly. There are always some very pretty peau de soie fabrics out for summer, which would look lovely interspersed with gauze or voile.

Friday, February 01, 2008

Thrift is Better than an Annuity

I found out about Wardrobe Refashion 2008 from Mel at Pipe Dreams and Purling Plans. It's a simple idea for reducing my consumerism and environmental impact: recycle, renovate, repair and create my wardrobe this year, without buying new clothes.

I will be spending today on the mending/finishing basket. One day won't cut it.......uh, especially if I stop to blog about it......but at least it's a start. And, if you've ever wondered how exactly you're supposed to patch a pair of jeans, wonder no longer.


You'll need medium or heavyweight fusible interfacing, scrap fabric (preferably the same fibre content as your garment, and pre-shrunk), an iron, pins or Stitch Witchery (fusible adhesive webbing), a sharp needle and thread. Once you have these things around, by the way, you won't need to buy them for a long time. Just get a half meter of both interfacing and quilting cotton - it'll last you quite a while and only cost a few dollars. If you prefer a heavier fabric, such as denim, you can skip the interfacing stage altogether. You can also cut patches out of worn out clothing - choose the less-worn bits, of course.


Fusible interfacing and quilting cotton.

Step One - Create a Patch.

Fuse a section of interfacing onto the back of the fabric, making sure it's on-grain, if you're using a woven interfacing.

Cut out your desired shape from the now-interfaced fabric (I used a sheep cookie cutter and an extra-fine Sharpie).


You can use any shape, keeping in mind that one with lots of points, such as a star, will start to show wear around the edges very quickly.

Now you have a patch - or, I suppose, you could always buy one from a fabric store. But it won't be nearly as interesting or satisfying, I'd wager.

Step Two - Baste the Patch.


You need to hold your patch in place while you sew it on. There are two ways to do this: you can use pins (and caution while sewing) or you can use fusible webbing. My mum calls this stuff "Stitch Witchery", which I think was a brand name back in the day. It comes in a roll from which you can snip off bits of the length you need.


Position the patch where you'd like it, with the Stitch Witchery underneath, completely covered by the patch - you don't want this stuff stuck to the soleplate of your iron.

Fusible web on the bottom - patch on the top.

Press, without steam and for a fairly long time. Use the appropriate setting for the fabric you're patching. The heat has to get right through the double-thickness of the patch, so test it by lifting up on the patch a little bit to see whether it's fused. It doesn't have to be solid as a rock - you're just trying to keep the thing in place while you hand-stitch it.


Fusing the patch to the jeans.

Or you could do it the old-fashioned way.

Step Three - Sew the Patch.

Hand-sewing is getting to be a lost art, as everyone knows. If you're not in the habit of mending, darning, reattaching buttons, and so on, you might have to practice a bit before you really get the hang of it.

For today's patches I used blanket stitch. I like the look of it on this patch fabric.

Working from LEFT to RIGHT, (though I hold my fabric so as to make it TOP to BOTTOM) bring needle out at point A (outer edge). Insert at point B (adjusting spacing as desired - I spaced mine about a millimeter apart), then with thread below the needle, come out at point C directly below. Repeat, noting that point C now becomes point A for the following stitch. Make sure your spaces are even - unless you want them uneven.

Taking the stitch - note thread is below needle tip (also note I did this one right to left - don't let it bring you down).


Drawing the loop smaller.


Pulling the thread tight, ready to take another stitch.


Here are a pair of finished patches on Charlotte's favourite jeans. These hearts had to be a bit on the big side, which brings me to my final note: Patch 'em as soon as they need it. Apparently it's true that a stitch in time saves nine.